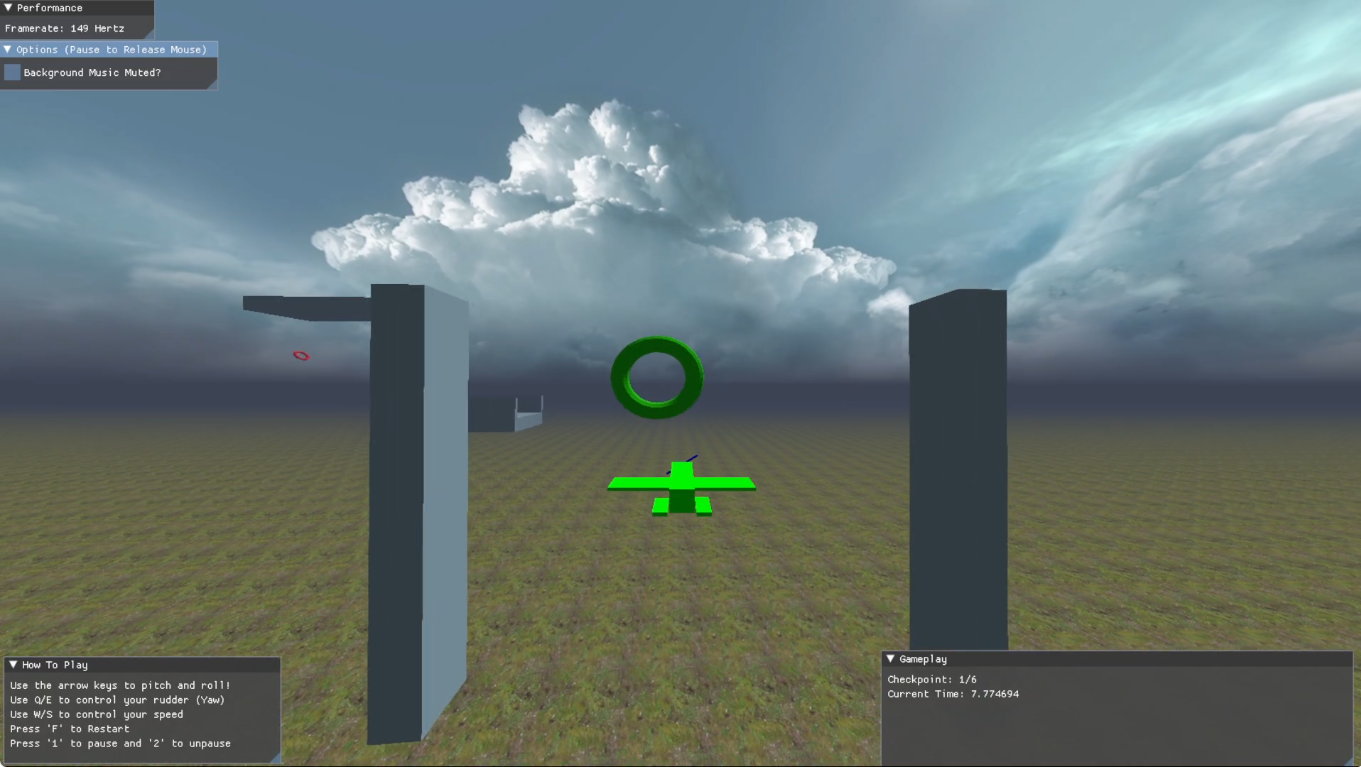
In late April 2023, I started working on a video game where the player could fly an aircraft vehicle around an open 3D space. The main appeal and challenge to me was creating it without a game engine and editor to support me. So instead of using a popular game engine like Unity or Unreal, I would be writing a lot of the code myself for instead coding a lot of features myself as a learning exercise and for fun.
For some brief context in layman’s terms, game engines and editors are to video game development as what ‘Adobe’s Photoshop’ would be towards manipulating photographs of making digital artwork or what Microsoft Office or Google Documents would be for making paperwork, essays or documents. They are industry standard tools that help standarize and make the process of game development more productive by covering problems that are already solved.
My decision to not use such a game engine for this project puts me into situations that allow me to attempt to solve these problems on my own, which provides a good educational outlet for developing my skills. One such challenge that can be taken for granted from these editors is being able to design the levels in the 3D space directly.
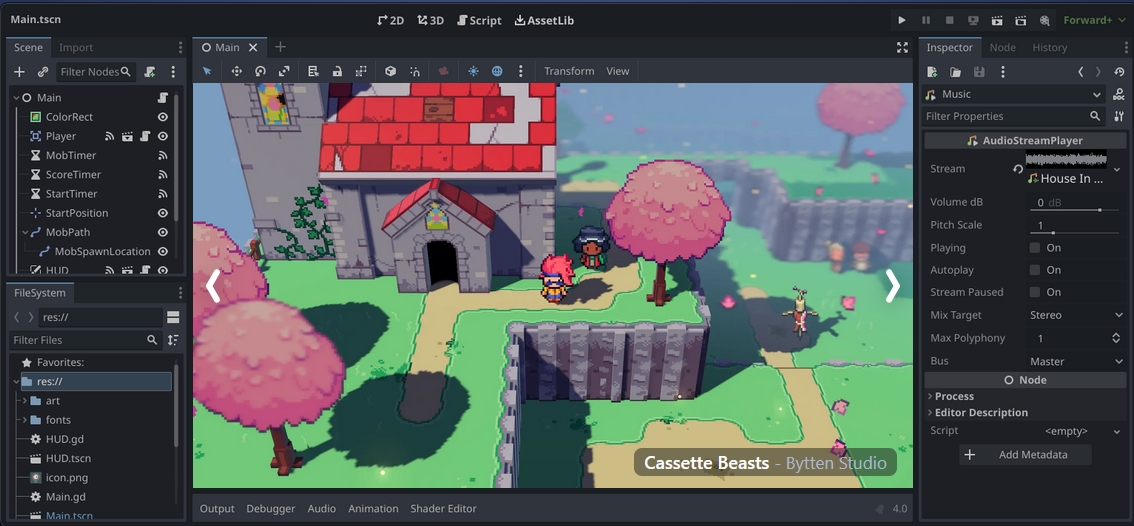 Screenshot example of the Godot Game Engine which showcases an editor.
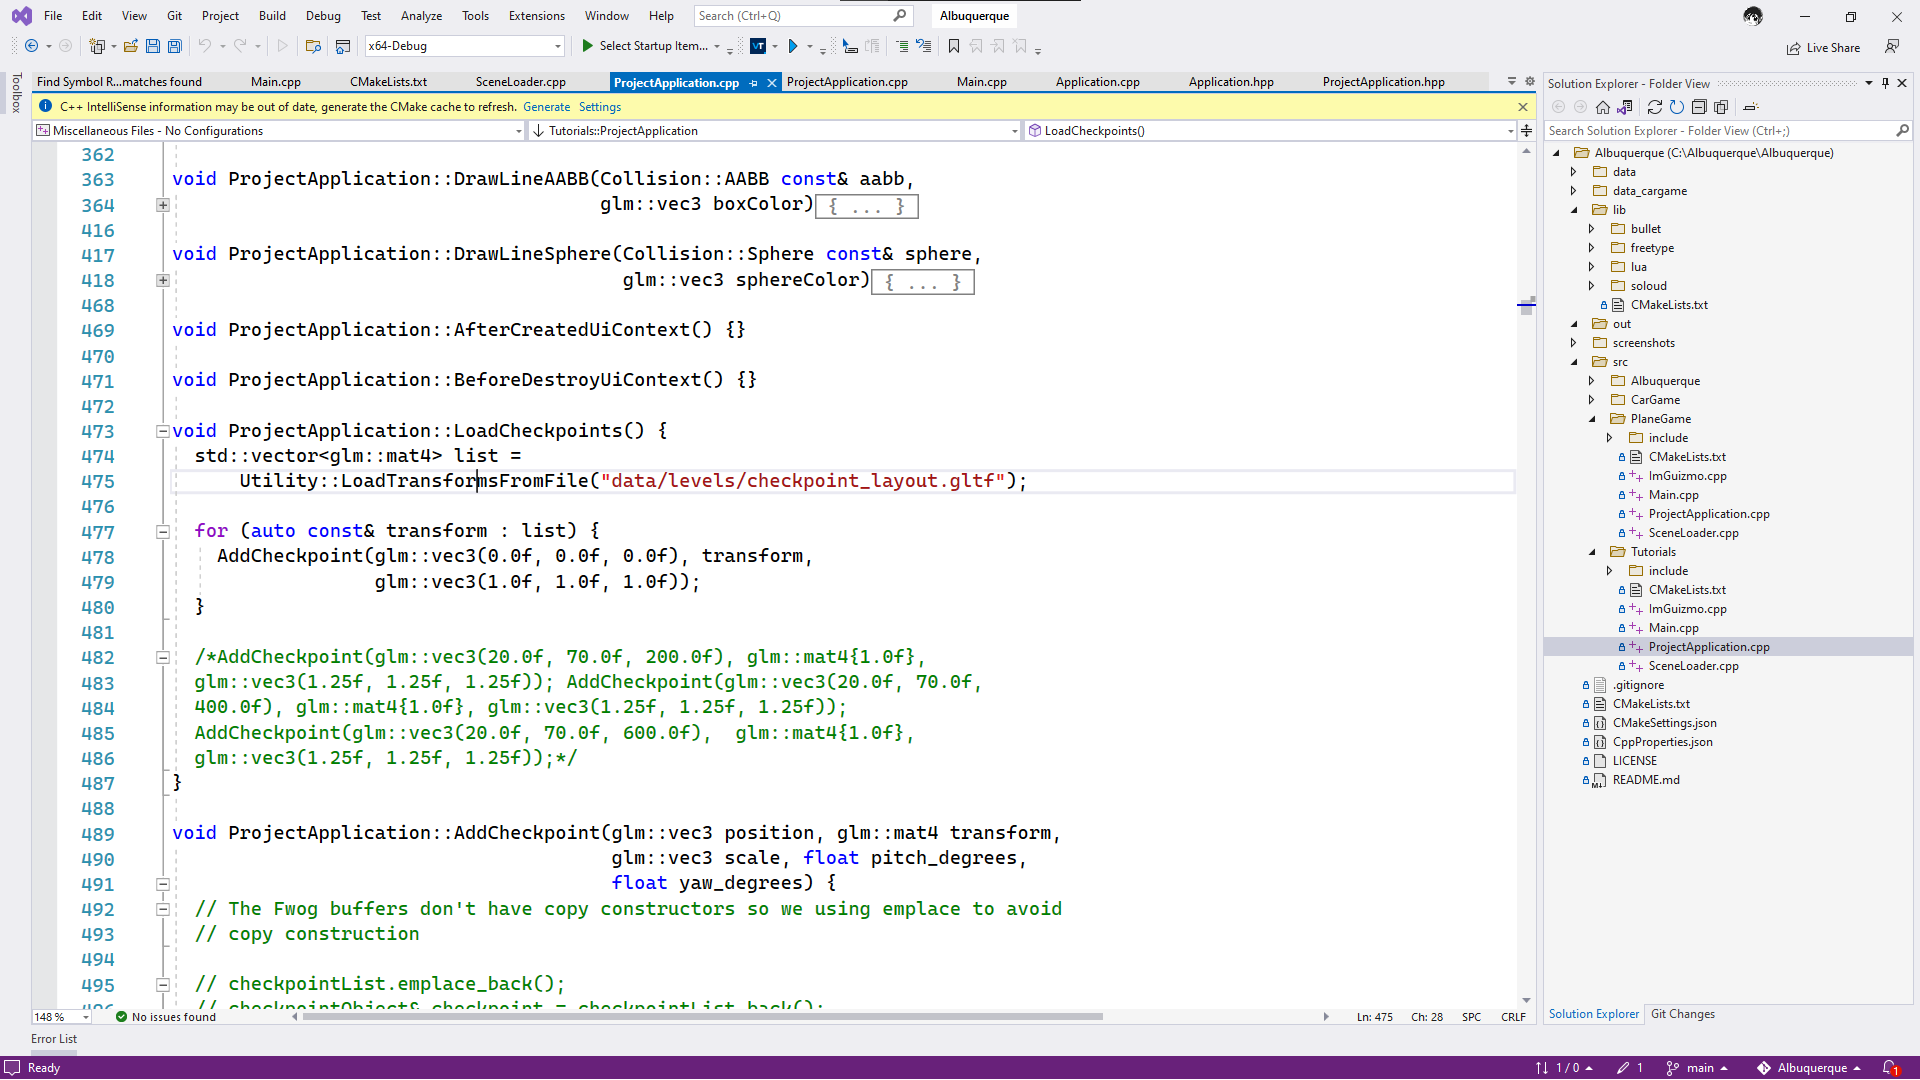
In contrast, my game is developed entirely in code as shown in the screenshot which shows my codebase opened in Microsoft Visual Studios. I don’t have any preview of the game world through an editor would need to write my own code to add those features myself.
How to Create Levels? Make an Editor?
The first natural instinct to overcome the problem of not having a level editor is to simply create one in our own game. This will allow us to interact with in the 3D space during runtime, creating tools to interact and manipulate objects in the space. We can then save such level files into our own file formats and load them ourselves in the future.
The process of creating such an editor requires a significant amount of work in production and testing. Many further problems have to be considered and solved, such as how to click objects in the space, how to transform them based off their position, rotation and scale. Whether we would allow quality of life features such as a way to organize our list of existing objects, whether we would want grid snapping features, camera controls and so on.
Even if the programmer tasked on this task is familiar with the problems at hand, the time commitment to implement and test them properly with coherency with existing features cannot be rushed. I have personally been familiar with working on such editors and tools in the past at my time as a DigiPen Singapore Student and understood first-hand the complexity of creating such an editor.
Since prototyping the obstacle-courses for this project should be done as soon as possible, I thought about other alternatives and came to a simple conclusion: “What if I could create the levels based off a 3D model file?”
Using a 3D modelling program like Maya or… Blender
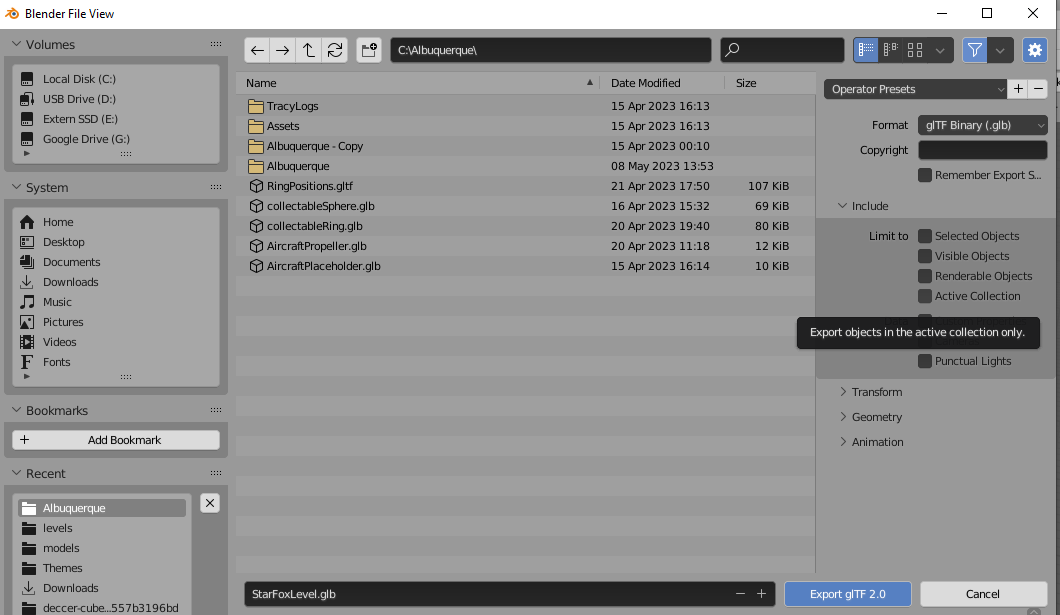
I already have many of the tools for manipulating 3D scenes provided for me in common 3D modelling applications such as Blender, which I have been using to create placeholder 3D models such as the aircraft. Of course, simply loading a big 3D file meant to represent the level does not solve the problem immediately. The game engine would need a way to identify which elements of that model represent gameplay features, such as checkpoints or collectables, and which elements of that model represent walls and barriers. It also would need to find some way to determine the collision data for all of those elements. There is no way to do this ‘automatically’ if it reads the model data as just ‘one model’.
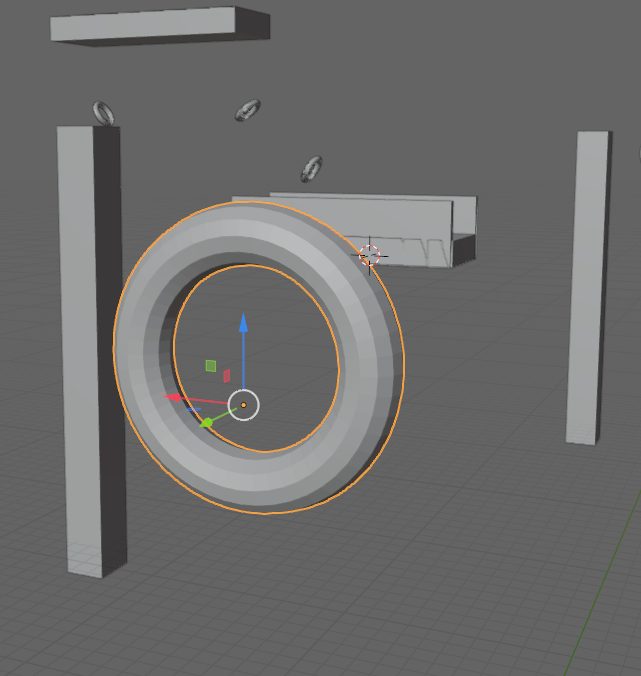
An example is if the above screenshot was exported as one model, it would be hard to detect the difference between the walls and the rings. This screenshot also shows the tools Blender enables for editing a level, such as the transform gizmo.
There is, however, a simple way to overcome this limitation. I had some experience working with the glTF file format due to a challenge in programming community that I am active in. The challenge’s quirk requires understanding the dependency of the transformation matrices applied to each model relative to a parent model, which gave me the idea to apply a similar concept to use glTF files to store data for video game levels.
The glTF file format handles transformations for individual scene objects (nodes, as these file formats usually call them) separate from vertex data that describes their actual shape. My game only required loading the data relevant for level creation and hence it only needed the position, scale and rotation of easily replicable objects such as checkpoints and walls, in order to recreate them efficiently using its own internal coding. Through that, my engine can create the collision shapes and data management on its own, and I can use the 3D modelling editor simply to help me visually place these objects in the space.
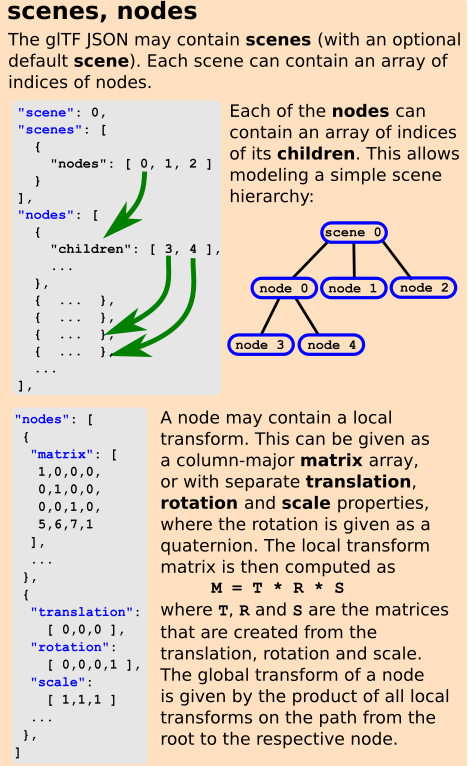
From the gLTF repo
The above screenshot from the official gLTF specification shows an example of how these transformation matrices are stored in a scene file. This can also be seen in actual files that were exported for my project as shown below, where I am able to parse through nodes representing the checkpoint rings in my project.
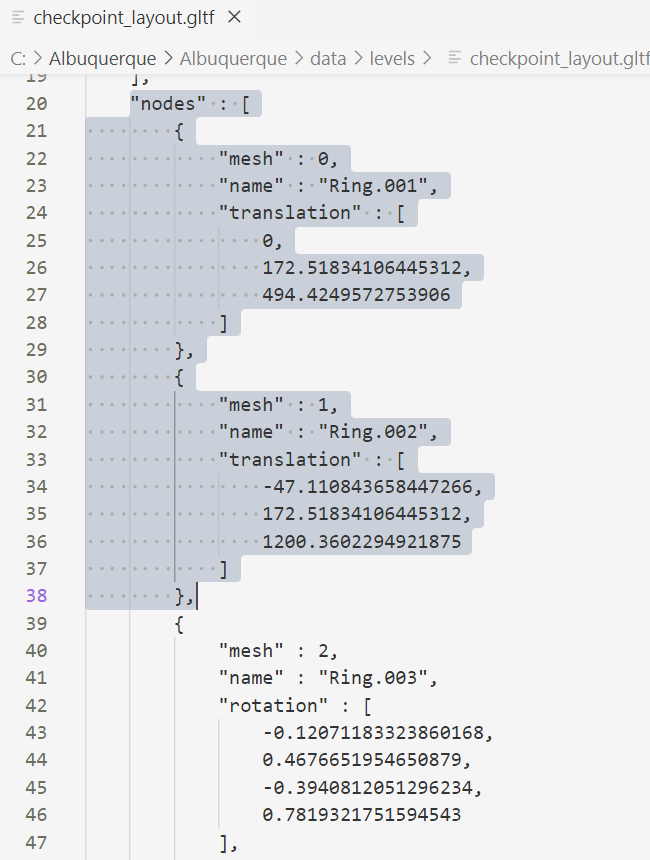
Examples of level files
By exporting my levels based off what Blender calls collections, I can export them as different .gltf files that represent different types of level data.

As such, the codebase can load .gltf file as usual using a gltf loader like tinyGLTF but choose only to parse the transforms, ignoring the buffers for vertices as meshes do not need to be created. The following extract is from ProjectApplication.cpp
1
2
3
4
5
6
7
8
9
void ProjectApplication::LoadCheckpoints() {
  std::vector<glm::mat4> list =
      Utility::LoadTransformsFromFile("data/levels/checkpoint_layout.gltf");

  for (auto const& transform : list) {
    AddCheckpoint(glm::vec3(0.0f, 0.0f, 0.0f), transform,
                  glm::vec3(1.0f, 1.0f, 1.0f));
  }
}
Inside LoadTransformsFromFile() there is the segment to load parse the transforms as detailed earlier. This can be seen inside SceneLoader.cpp
1
2
3
4
5
6
7
8
9
10
11
12
13
14
15
16
17
18
19
20
21
22
23
24
25
26
27
28
29
30
31
std::vector<glm::mat4> LoadTransformsFromFile(std::string_view fileName, glm::mat4 rootTransform, bool binary)
{

//...other code here...//

std::vector<glm::mat4> globalTransformList;
std::stack<std::pair<const tinygltf::Node*, glm::mat4>> nodeStack;

for (int nodeIndex : model.scenes[0].nodes)
{
    nodeStack.emplace(&model.nodes[nodeIndex], rootTransform);
}

while (!nodeStack.empty())
{
    decltype(nodeStack)::value_type top = nodeStack.top();
    const auto& [node, parentGlobalTransform] = top;
    nodeStack.pop();

    glm::mat4 localTransform = NodeToMat4(*node);
    glm::mat4 globalTransform = parentGlobalTransform * localTransform;
    globalTransformList.push_back(globalTransform);

    for (int childNodeIndex : node->children)
    {
        nodeStack.emplace(&model.nodes[childNodeIndex], globalTransform);
    }
}
std::reverse(globalTransformList.begin(), globalTransformList.end());
return globalTransformList;
}
This allows the level to create the interactable objects and collision shapes for them incrementally, only adjusting their transformation based off the level data.
Using Paint Software for 2D Level Editing
In retrospect, this is not the first time I had applied the concept of repurposing a data format intended to represent digital art to use art programs for video game level editing. As a freshman undergraduate at Digipen Singapore, I also came up with a very similar concept for the project Pixel Perfect, which also has its own page on this blog.
The following gif is an extract from the trailer which showcases using such tools in action in the project.
In this project, .bmp file formats were proposed as a method to create many levels for a 2D action platformer, as it would allow our team members to create levels using pixel art software like Aesprite or Microsoft Paint.
This idea was originally inspired by one of our classes teaching us the use of serializing and deserializing simple .txt files (and later binary file formats) to store collision data for a platform. The 0s represented ‘empty space’ in the 2D level grid, while the 1s represented ‘solid space’ that characters can collide with.
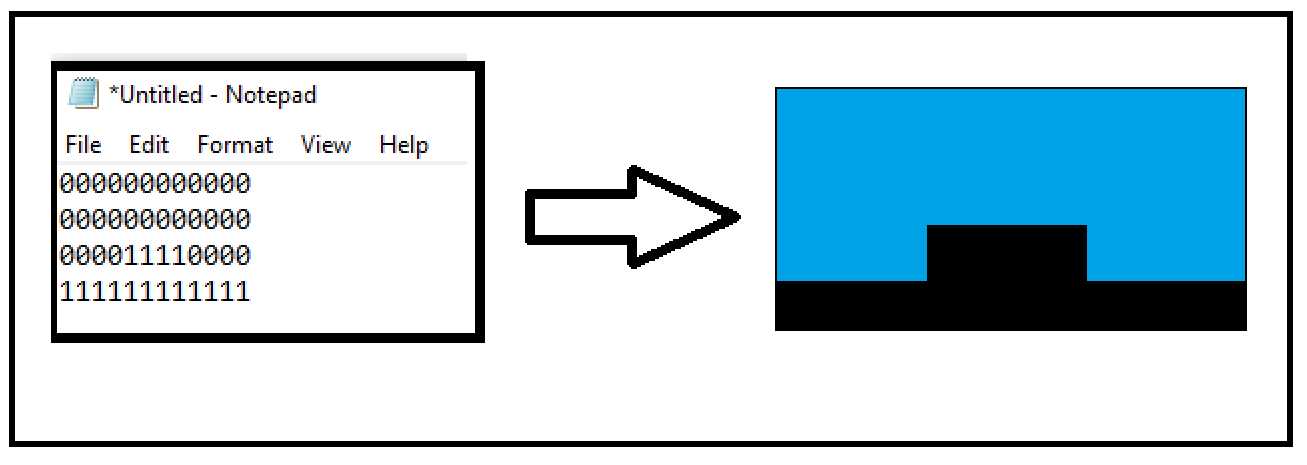
A simple example of how a ‘0 and 1’ style serialized level data can translate to a layout in a level.
As the bmp file format stores color data in sequence so I realized that we can apply the same concept but using RGB data values to represent different types of level tile data instead of just single digit numbers. We can have colors decided prior, such as a specific RGB value of green to represent the player’s starting position of a level.
The following c-style code is an extract from the same 2020 freshman year student project that contains the mentioned .bmp parsing in that project, with the image generated with the tool Carbon as it is too long to be reasonably included as a code caption. The extract is from a private repo from an undergraduate project.

Researching Other Examples
It is not uncommon for developers to repurpose existing external tools to aid in asset creation for entertainment projects, including level editors for video games.
Insert Mario in Blender
One publicly notable example of using Blender as a level editor is in creating fan-made unofficial levels for Nintendo’s Super Mario Brothers 64. This can be seen the plugin libsm64-blender which adds a controllable 3D Mario character to a blender scene, with collision data generated on the fly. This allows players to test their Mario levels inside the Blender editor directly. The is an example gif from the linked page showcasing the player interacting with the level created in Blender.
Quake levels in Godot
While it is more niche, it is also possible to extend the same concept towards using other game engines entirely for games made in different game engines. The Godot plugin Qodot allows users to import and edit level files for the game Quake, which was not made with Godot. This allows a developer the option of using Quake level editor tools such as [TrenchBroom](https://trenchbroom.github.io/](https://trenchbroom.github.io/) to create levels for their own game projects in Godot or to use Godot to edit Quake levels, depending on which they prefer. As such they can make full use of features from either engine according to their personal skill level with that editor or needs. This can be seen in the following gif from the linked page showcasing the plugin importing a Quake level in the Godot game engine.
Tiled
Finally, it might be worth mentioning that Tiled is a popular level-editor for 2D games that exists specifically to create tilemaps that can be exported to other engines such as Godot, Unity or even RPG Maker. It can be particularly powerful for people working in frameworks like Phaser or MonoGame which do not have editors. Maybe I could cover game frameworks in a future post.
Moving Forward
While this article showcases the value of using Blender as a prototype editor for my hobbyist game project, there are still certain improvements worth considering, which may be reviewed in depth through a follow-up article once these improvements have been implemented and tested.
The first sector of performance improvement includes the complexity for parsing the gLTF files at runtime for each level. The first consideration is that different files for each type of object data may increase the filesize of level data as well as create a potential of human error when organizing them. One possible solution is to create a script plugin in Blender to support exporting to a specialized version of gLTF or my own custom file format while another is to create a script that does post-processing on the exported files after the export process.
The runtime performance of parsing the gLTF data should be considered. Ideally, once level data has been parsed and processed by the game engine or another codebase, it can be further reexported into a binary file format that is designed to be loaded fast at proper gameplay runtime.
There is also the factor that some toolset to edit levels at runtime will be useful to make minor adjustments and tweaks during playtesting. Currently the game features a simple 3D picking to interact with the collider of wall objects but further development can allow simple adjustment of data placement that can be saved to the level data. The following gif showcases footage early in development of clicking objects at runtime.
Another thing I would like to improve is combining all level data generated from the .glTF files into a single file.
Conclusion
So what is the overall purpose of discussing all the following examples of ways we can develop level content for a game without making a level editor? By showcasing the creative and practical ways we can continue to do developmental work in prototyping phases of project by repurposing the tools that already exist, we can adopt a important mindset that allows faster prototyping and incremental development as creating separate tools and editors can cause a block in developing the actual levels and environments of a game.
By considering the development of an editor and development of gameplay levels to be more decoupled earlier on in development, as well as identifying the actual requirements and needs of designers that are specific to their actual use case.
In other words, it can be easy as software developer to fall victim to the idiom that states “if all you have is a hammer, everything looks like a nail” by assuming that every problem in software development that needs to be solved requires a code-focused solution. It is therefore worth considering if other options are possible, at least as scaffolding, to avoid having the development of specialized tools to be a blocking of early progress. In some ways, this mindset can even extend to game engines as a whole as described by a different blog posted titled “Write Games, Not Engines” attributed to Josh Petrie.
Perhaps in the future, I can link back to this page if I make a blog article specialising on just the concept of ‘non-code solutions as a software engineer’.
Comments powered by Disqus.